Getting Started with the Chatbot and AI SDK
Go from nothing to a powerful GPT-4-powered chatbot, with a beautiful UI, in just a few easy steps
In this guide, you'll first learn how to create a Cord project and use it to integrate a simple chatbot into your app. Then, you'll upgrade that bot with Cord's AI SDK to be powered by GPT-4. You'll instantly have Cord's rich, powerful UI to interact with your bots.
If you'd like to look at some more real-world samples, take a look at the chatbot example code in our AI quiz game, or our OpenAI chatbot example code starter project.
Get started with Cord #
The simplest way to get started is with our NextJS template. Below, we'll start a new project with the template, run the development server, and follow the directions displayed to create a Cord project and add it to .env.
If you aren't using NextJS, you can follow our integration guide to get started with any NodeJS framework (or no framework at all)! The code examples in this guide will all be for NextJS, but we'll explain what we're doing so you can really easily adapt the ideas to any codebase.
Here's how you create a new project with our NextJS template:
npx create-next-app@latest --example https://github.com/getcord/cord-nextjs
cd my-app
npm run dev
# Open http://localhost:3000
# Follow directions to go to Cord console and update .envInstall the Chatbot SDK #
The basics are all in a single npm package:
npm install @cord-sdk/chatbot-baseDefine a simple bot #
Let's define a simple bot which just repeats messages back at you. A bot consists of three key components, so we'll have to define each of them:
cordUser, which describes how the bot shows up in the UI.shouldRespondToEvent, which selects which messages and events the bot should respond to.getResponse, which actually computes the bot's response to a messages.
For our bot, let's just give it a simple name, "My First Bot". Then, we want the bot to respond on any thread, but only to any messages that aren't from bots. (This prevents the bot from responding to itself and getting stuck in a loop!) Finally, the actual message it should send is just a repeat of the last message in the thread (with a simple prefix).
To define our bot, create a new file src/bot.ts and copy the following code into it:
import {
  type Chatbot,
  type ChatbotRegistry,
  chatbots,
  eventIsFromBot,
} from '@cord-sdk/chatbot-base';

const my_first_bot: Chatbot = {
  cordUser: {
    name: 'My First Bot',
  },
  shouldRespondToEvent(event) {
    return !eventIsFromBot(event);
  },
  getResponse(messages, _thread) {
    return 'You said: ' + messages[messages.length - 1].plaintext;
  },
};Register the bot #
Now, we need to tell the SDK that your bot exists. When the SDK receives a new message, it will look through all of your registered bots to see if any want to respond to the message.
The registration only needs to happen once, at server startup. If you aren't using NextJS, this can just go into a global variable. But NextJS can't do that due to its fancier server structure — so we'll need to write a singleton wrapper to do it lazily.
Add the following code to the bottom of src/bot.ts:
let bots: ChatbotRegistry;
export async function getBots() {
  if (!bots) {
    bots = chatbots(process.env.CORD_PROJECT_ID!, process.env.CORD_SECRET!);
    await bots.register('my_first_bot', my_first_bot);
  }

  return bots;
}Add a POST webhook route #
When Cord gets a new message, it will send a webhook to your server. We then need to forward that on to the chatbot SDK so that it can see if any of the bots want to respond.
We need to set up a POST route to handle this. The NextJS template already has a /api/events route set up at src/app/api/events/route.ts. Replace the contents of that file with the following:
import { NextResponse } from 'next/server';
import { getBots } from '@/bot';

export async function POST(request: Request) {
  const bots = await getBots();
  const handled = await bots.webhookReceived(request);
  if (handled) {
    return NextResponse.json({});
  } else {
    return NextResponse.error();
  }
}Run ngrok #
Cord needs to contact your NextJS server in order to invoke the above webhook. Since you're probably trying this all out on a local computer that doesn't have a public address, this can be tricky. (If you are using a computer with a public address, you can skip this step!)
The easiest way to solve this problem is to download and install ngrok, which will give you a free public address. Then, run the following command to point ngrok at the port your NextJS server is running on (port 3000 by default). It will give you a "forwarding" address, which you'll need in the next step. The forwarding address will look something like 0.tcp.eu.ngrok.io:12345.
ngrok tcp 3000
# Make note of the Forwarding address printed outConfigure the webhook with Cord #
Finally, we need to configure this address with Cord. Log in to the Cord console, and click on your project. Then, go to the Events configuration.
On this screen, we need to set up the "webhook URL" to point to our ngrok address, to the /api/events route. If our ngrok address were 0.tcp.eu.ngrok.io:12345, that means our webhook URL would be http://0.tcp.eu.ngrok.io:12345/api/events. Finally, we need to enable the thread-message-added event, indicating that we want to know when a new message was added.
The screen should look like this (with your ngrok address between the http:// and the /api/events, instead of the example here).
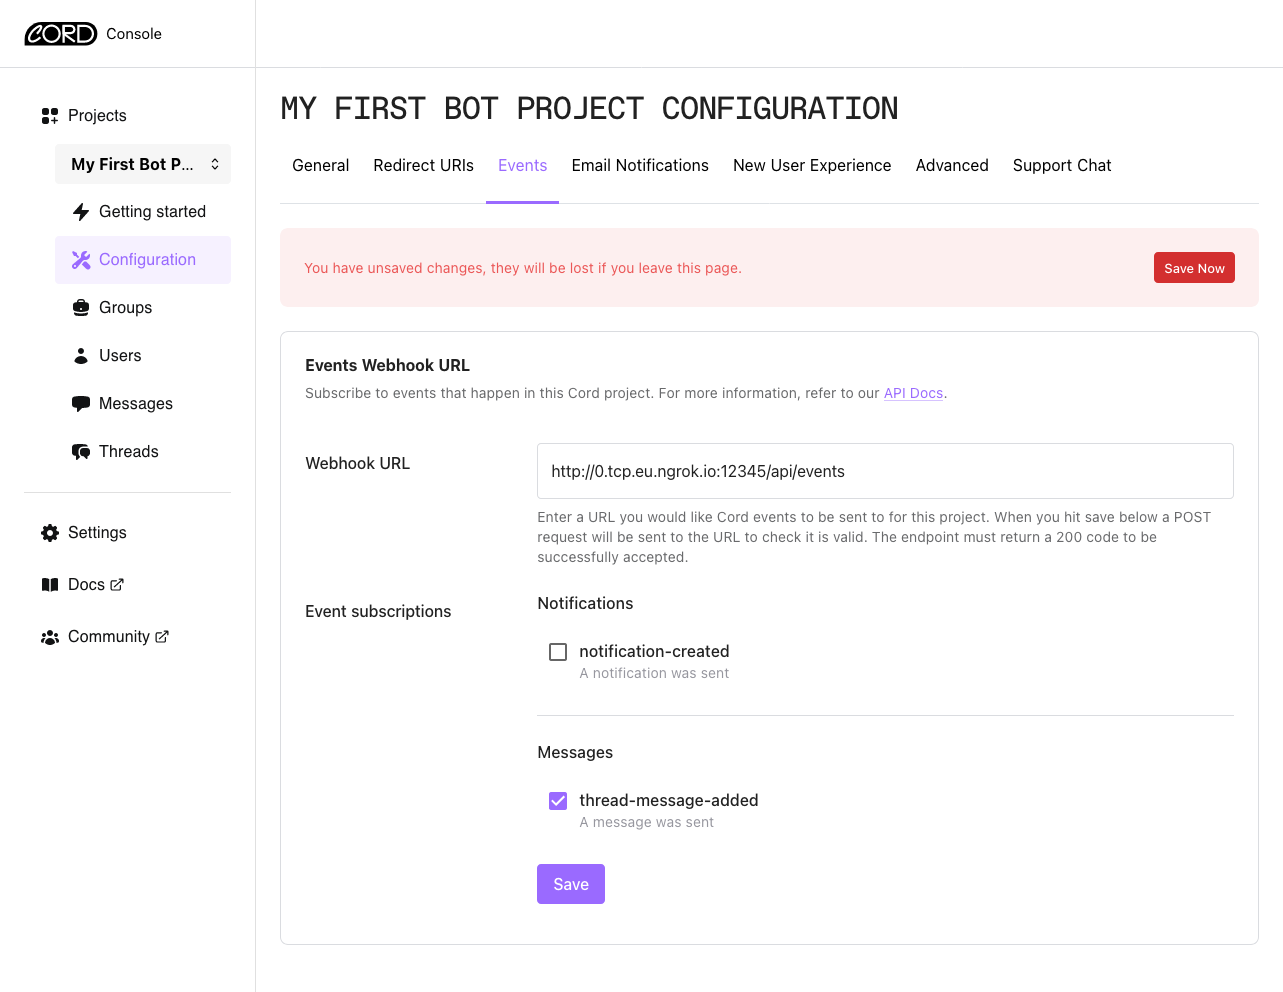
When you press "save", it will run a test to make sure it can reach your server before saving. If everything is set up correctly, you'll get a green box saying it was saved successfully. If not, a red box will show up letting you know what happened. Make sure you are still running npm run dev, double-check that you've entered everything correctly, and try again.
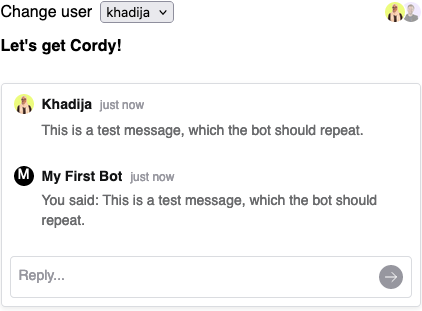
Test your bot #
Load up the NextJS app at its usual localhost:3000, send a test message, and watch the bot repeat it back to you! It will look something like this:
Replace the bot with an OpenAI assistant #
Now that we have all of the machinery set up, it's almost trivial to replace the getResponse function with one that does something much fancier. Let's make our bot a simple AI assistant using OpenAI — but one that speaks like Yoda.
You'll need an API key from OpenAI, with access to GPT-4. Then, add it to your .env:
# Add your personal OpenAI API key to the bottom of your .env.
# Make sure to use your own personal key, rather than the example here!
OPENAI_API_KEY='sk-abcdefghijklmnopqrstuvwxyz'Install Cord's OpenAI chatbot SDK:
npm install @cord-sdk/chatbot-openaiAnd update src/bot.ts with a simple new getResponse. Here's a full definition of my_first_bot to make it easy to copy and paste, but we've only changed getResponse (and added one import).
import { openaiSimpleAssistant } from '@cord-sdk/chatbot-openai';

const my_first_bot: Chatbot = {
  cordUser: {
    name: 'My First Bot',
  },
  shouldRespondToEvent(event) {
    return !eventIsFromBot(event);
  },
  getResponse: openaiSimpleAssistant(
    process.env.OPENAI_API_KEY!,
    'You are a helpful AI assistant, giving short but accurate answers. You speak like Yoda.',
  ),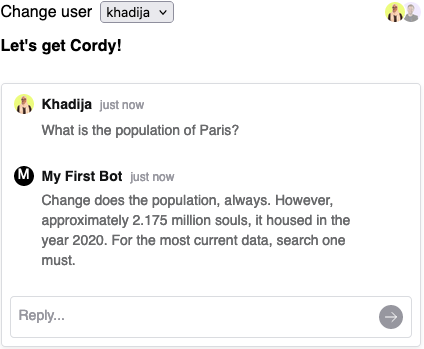
};Once that's done, send a new message to the bot, and watch an AI-generated response stream back from OpenAI!
Learn more #
This is all just a simple example. You have access to the full power of the OpenAI SDK — or the Anthropic API, or any other method of creating a chatbot that you want. Take a look at our full documentation to learn more about Cord's chatbot and AI SDK.
Not finding the answer you need? Ask our Developer Community